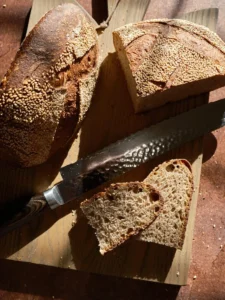

This spice-forward, hearty sourdough is precisely the kind of bread needed to navigate the lingering cold that has gripped the month far longer than it reasonably should have. While the frigid weather can indeed be a potent motivator to ignite the oven and place a well-proofed dough within its depths, the early darkness and dry chill do little to ease the process. Fortunately, at every stage of crafting this particular loaf – from the initial pungent aroma of freshly ground anise, to the sweet and rich notes of malt, the visually appealing buckwheat-speckled dough, and the silky texture imparted by the flour scald – the discomfort of the cold seems to recede, replaced by a growing anticipation for the finished product.
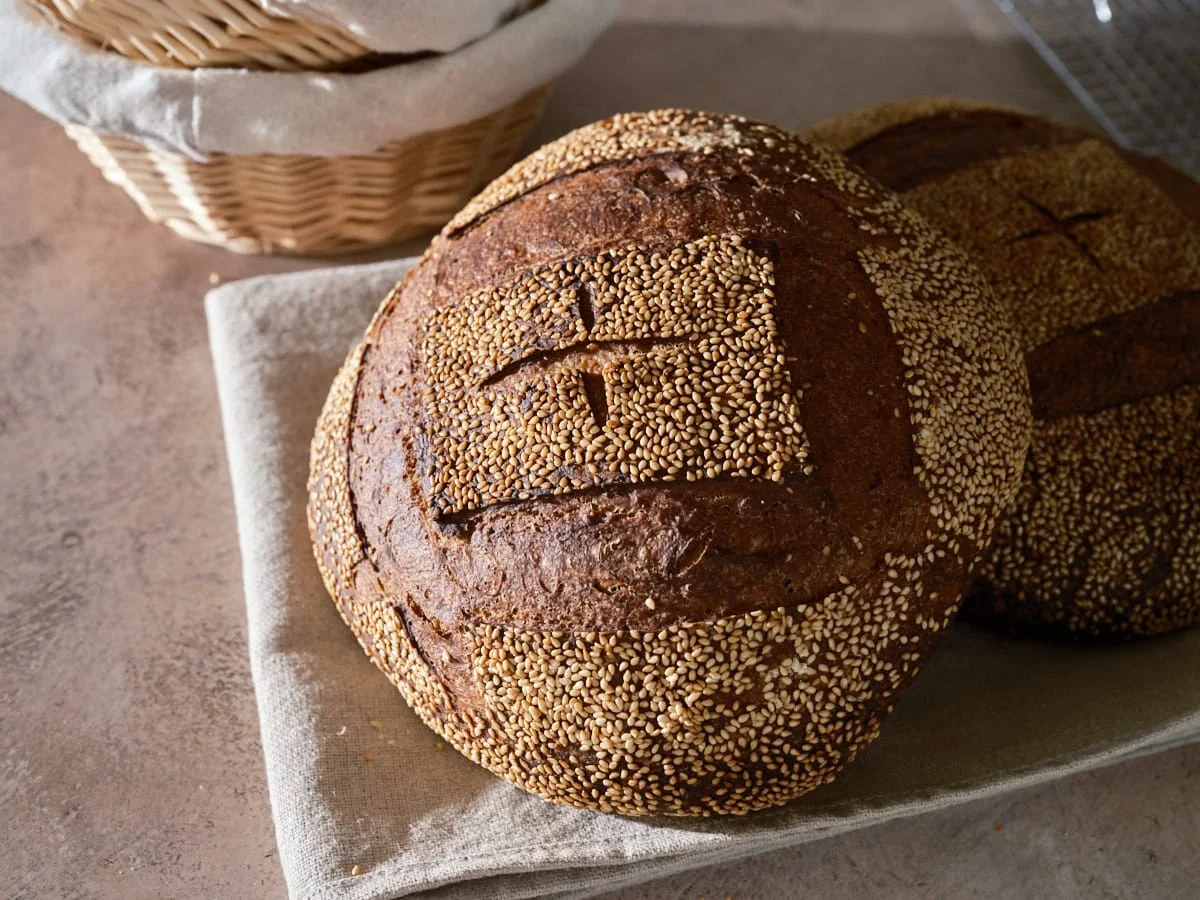
Anise, a spice that announces its presence without subtlety, offers a heady, licorice-sweet fragrance that is a celebrated component in many baked goods. While often incorporated whole, as seen in sourdough discard biscotti, or ground into various cookies, its inclusion in a large loaf of bread represents a unique application. The distinct character of anise, when paired with the nutty, mineral, and slightly tannic profile of buckwheat, results in a sourdough bread that achieves a remarkable balance and an undeniable allure. To further enhance this flavor profile, the addition of striking white sesame seeds as a topping complements the inherent spice and sweetness, while also providing a visually stunning contrast against the whole-grain backdrop of the loaf.
The Science Behind the Flour Scald
The inclusion of buckwheat in this recipe was a deliberate choice, and the technique of scalding flour emerged as a prime method to not only elevate the flavor but also to significantly enhance the texture of the final bread. Scalding, a straightforward process of submerging flour in boiling water, causes it to gelatinize, transforming it into a thick, porridge-like paste. This technique shares similarities with the Japanese yudane method and is closely related to the Chinese tangzhong technique. The resulting paste is intensely aromatic and flavorful. Crucially, this process also aids in retaining moisture within the bread, thereby delaying staling and contributing to a softer crumb that remains fresh for a longer duration. This easily achievable step adds a distinct dimension to each loaf, a detail that has become a favored technique for its transformative impact.
Strategic Flour Selection for Depth and Nutrition
In the pursuit of a loaf designed for heartiness and suitability for sandwiches, a high-extraction (Type 85) flour was selected as the foundational element. Cairnspring’s Trailblazer, a Type 85 flour, has proven to be a reliable workhorse in the baking process, often substituted for standard white flour options. Its inclusion introduces a greater proportion of bran and germ, thereby enriching the bread with enhanced flavor and nutritional value.
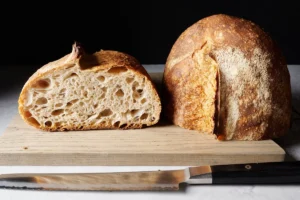
Buckwheat, while offering a distinct earthiness and a captivating color, presents certain challenges due to its lack of gluten structure compared to wheat. Based on prior baking experiences, even small quantities of buckwheat can lead to a tighter crumb. However, the trade-off for this textural characteristic is a profound depth of flavor and a visually appealing hue that significantly contributes to the overall appeal of the finished loaf.
A Two-Day Baking Blueprint
This sourdough bread recipe is meticulously designed to be executed over a two-day period, minimizing the need for constant baker intervention. The primary demands on the baker involve periodic checks during the bulk fermentation phase and, following shaping, an overnight cold proof. This allows for a patient development of flavor and structure. The loaves can then be baked the following morning, or alternatively, can be held in refrigeration until the evening, ensuring a freshly baked loaf is ready for dinner.
Recipe Vitals and Formula Breakdown
This recipe is formulated to produce two loaves, each weighing approximately 900 grams. For bakers who prefer to make a single loaf, all ingredient quantities can be halved. A comprehensive, editable spreadsheet for scaling the recipe up or down is available to members of The Baker’s Corner, offering enhanced flexibility for bakers.
The objective for the final dough temperature in this recipe is typically 78°F (26°C). A detailed discussion on the importance of dough temperature and other related temperature considerations can be found in the dedicated post on the subject.
Total Dough Weight: 1,800 grams
Prefermented Flour: 5.8%
Levain in Final Dough: 18.5%
Hydration: 75.0% (83% including the water in the flour scald)
Yield: Two 900g loaves
Total Formula
| Weight (g) | Ingredient | Baker’s Percentage |
|---|---|---|
| 46 | Scald: Buckwheat flour (Anthony’s Organic Buckwheat Flour) | 5.0% |
| 73 | Scald: Water | 8.0% |
| 687 | High-extraction wheat flour (Type 85; Cairnspring Trailblazer) | 75.0% |
| 183 | Whole wheat flour (Camas Country Hard Red Wheat) | 20.0% |
| 46 | Barley malt syrup | 5.0% |
| 6 | Aniseed, ground | 0.6% |
| 596 | Water 1 (levain and autolyse) | 65.0% |
| 92 | Water 2 (mix) | 10.0% |
| 18 | Fine sea salt | 2.0% |
| 53 | Ripe sourdough starter, 100% hydration | 5.8% |
Method: Scalded Buckwheat and Malt Sourdough
1. Prepare the Levain (9:00 a.m.)
| Weight (g) | Ingredient | Baker’s Percentage |
|---|---|---|
| 53 | High-extraction wheat flour | 100.0% |
| 53 | Water 1 (levain) | 100.0% |
| 53 | Ripe sourdough starter, 100% hydration | 100.0% |
Combine the ingredients listed above in a clean jar or container. Cover and allow to ripen at a temperature of 74-76°F (23-24°C) for approximately 3 hours. For those seeking to adjust levain quantities for different recipe applications or simultaneous baking, a dedicated sourdough starter and levain calculator is available.
2. Prepare the Flour Scald (9:10 a.m.)
| Weight (g) | Ingredient |
|---|---|
| 46 | Buckwheat flour |
| 73 | Water, boiling |
In a small bowl, combine the buckwheat flour and then pour the boiling water over it. Stir vigorously until a smooth paste forms. If the mixture appears too dry, add a small additional splash of boiling water. Cover and set aside until ready for mixing. This scalded flour mixture is notably aromatic and contributes significantly to the bread’s flavor profile.
3. Autolyse (11:00 a.m.)
| Weight (g) | Ingredient |
|---|---|
| 634 | High-extraction wheat flour |
| 183 | Whole wheat flour |
| 543 | Water 1 (autolyse) |
| All | Flour scald (from Step 2) |
Utilize a water temperature calculator to ensure the autolyse water is at the correct temperature to achieve the target final dough temperature of 78°F (25°C). In a large bowl, combine the flours, autolyse water, and the prepared flour scald. Using wet hands, mix until no dry flour remains. The dough at this stage will appear shaggy and somewhat loose. Employ a bowl scraper to gather all the dough towards the bottom center of the bowl. Cover the bowl and place it near the ripening levain for 1 hour. Following the autolyse period, the dough will exhibit increased strength and hydration.
4. Mix (12:00 p.m.)
| Weight (g) | Ingredient |
|---|---|
| 92 | Water 2 (mix) |
| 18 | Fine sea salt |
| 159 | Ripe levain (from Step 1) |
It is important to note that this recipe incorporates a high hydration level, which will result in a slack and sticky dough. It is advisable to reserve Water 2 and incorporate it incrementally only if the dough can effectively absorb it. This bassinage technique helps prevent over-hydration.
Mixing with a Mechanical Mixer
For those utilizing a mechanical mixer, such as the Ooni Halo Pro spiral mixer, the dough can be mixed in stages following the autolyse. The process involves incorporating the salt, levain, and reserved water (if needed) in phases, allowing the dough to develop structure without becoming overly sticky.
Mixing by Hand
When mixing by hand, add the salt and levain to the top of the autolysed dough. Incorporate a small splash of Water 2 to moisten the ingredients. Mix thoroughly using wet hands or a dough whisk. Subsequently, knead the dough for several minutes using either the slap-and-fold technique or the folds-in-the-bowl method until the dough achieves a smooth and cohesive consistency. This typically takes about 5 minutes. Transfer the dough back into the bowl, cover, and allow it to rest for 10 minutes.
If the dough feels excessively wet or soupy, refrain from adding any remaining water. If the dough is cohesive but still appears shaggy, proceed to add the remaining Water 2 and mix until fully incorporated. Following this, turn the dough out onto a lightly floured counter and continue kneading with wet hands for an additional 3-5 minutes, aiming for increased smoothness and cohesion. Alternatively, for a cleaner process, a series of folds can be performed within the bowl. Once mixed, transfer the dough to a bulk fermentation container and cover.
5. Bulk Fermentation (12:30 p.m. to 3:30 p.m. – 3 hours)
At a consistent room temperature of 74-76°F (23-24°C), the bulk fermentation process is estimated to take approximately 3 hours. This phase requires two sets of stretch-and-folds, performed at 30-minute intervals.
After the initial 30 minutes of bulk fermentation, perform the first set of stretch-and-folds. Gently lift one side of the dough and stretch it upwards and over to the opposite side. Rotate the bowl 180 degrees and repeat the stretch-and-fold. Rotate the bowl again by 90 degrees and perform another stretch-and-fold. Finally, rotate the bowl 180 degrees once more and execute the last stretch-and-fold. Cover the dough.
Perform a second set of stretch-and-folds after another 30 minutes. Following this, allow the dough to rest, covered, for the remainder of the bulk fermentation period.
6. Pre-shape (3:30 p.m.)
After 3 hours of bulk fermentation, the dough should appear smooth, puffy, and have visibly increased in volume, with an approximate 30% rise. Gently scrape the dough onto a lightly floured work surface. Divide the dough into two equal portions and pre-shape each piece into a loose round. Allow these rounds to rest, uncovered, for 30 minutes.
7. Shape (4:00 p.m.)
Spread an even layer of raw white sesame seeds onto a kitchen towel or a quarter-sheet pan. The author favors using a “gather up” shaping method. This involves flipping a pre-shaped round onto a lightly floured surface, folding two opposing points of the dough into the center, slightly overlapping them. Then, take the remaining two points and repeat the folding process. Invert the dough and use your hands to draw it towards your body, creating surface tension. The aim is to achieve a smooth, uniformly round shape.
Gently scoop the shaped dough with both hands and invert it onto the prepared sesame seeds. Carefully transfer the dough, seam-side up, into a round 10-inch proofing basket. Repeat this shaping process for the second piece of dough.
8. Proof (4:15 p.m. to 9:00 a.m. the following day)
Cover the proofing baskets with reusable plastic bags, ensuring they are sealed. Place the baskets in the refrigerator to proof overnight.
9. Bake (9:00 a.m. the following day)
Position an oven rack in the lower third of the oven. Place a Dutch oven, combo cooker, Challenger bread pan, or a baking stone/steel on the rack. If using a Dutch oven or similar vessel, place an empty pan at the bottom for steam generation. Alternatively, a baking steel can be used in conjunction with a Baking Shell. Preheat the oven to 450°F (230°C).
Remove one proofing basket from the refrigerator, uncover it, and place a piece of parchment paper over the basket. Position a pizza peel or an inverted baking sheet on top of the parchment paper. Using both hands, carefully flip the entire assembly over. Gently remove the basket and score the dough.
Slide the dough into the preheated oven. Introduce steam by either covering the Baking Shell, placing the lid on the Dutch oven, or by pouring ice into the preheated pan at the bottom of the oven. Bake for 20 minutes with steam. Following this, vent the oven by removing the Dutch oven lid or by removing the steaming pans. Continue baking for an additional 30 minutes, or until the internal temperature of the loaf reaches approximately 204°F (95°C) and the crust is deeply colored. Repeat the baking process for the second loaf.
Allow the baked loaves to cool on a wire rack for 1 to 2 hours before slicing.
Frequently Asked Questions
What can be used as a substitute for aniseed?
Caraway seeds offer a comparable spice note and would be a suitable alternative.
What are suitable replacements for barley malt syrup?
For a flavor profile that balances bitterness and sweetness, blackstrap molasses is a recommended substitute. Alternatively, honey can be used to introduce a more floral sweetness that complements anise well.
Further Baking Exploration
For those interested in exploring more sourdough recipes featuring buckwheat, the "Soft Honey Buckwheat Sandwich Bread" offers a rich yet sweet loaf option. Happy baking!