
The biting chill of winter, which has lingered far longer than anticipated this month, has spurred a renewed appreciation for the comforting warmth of a hearth and the robust aroma of freshly baked bread. This spice-forward, hearty sourdough is precisely the kind of creation designed to combat the lingering cold, transforming a frigid kitchen into a sanctuary of warmth and inviting aromas. While the stark reality of early darkness and dry, cold air can often dampen spirits, the process of crafting this particular loaf offers a delightful antidote. From the initial pungent release of anise as the spice is ground, to the sweet and rich notes of malt, the visually appealing buckwheat-speckled dough, and the silken texture imparted by the flour scald, each step of its creation serves as a gentle reminder that the cold outside need not dictate the warmth within.
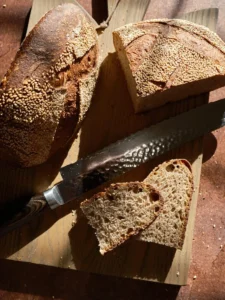
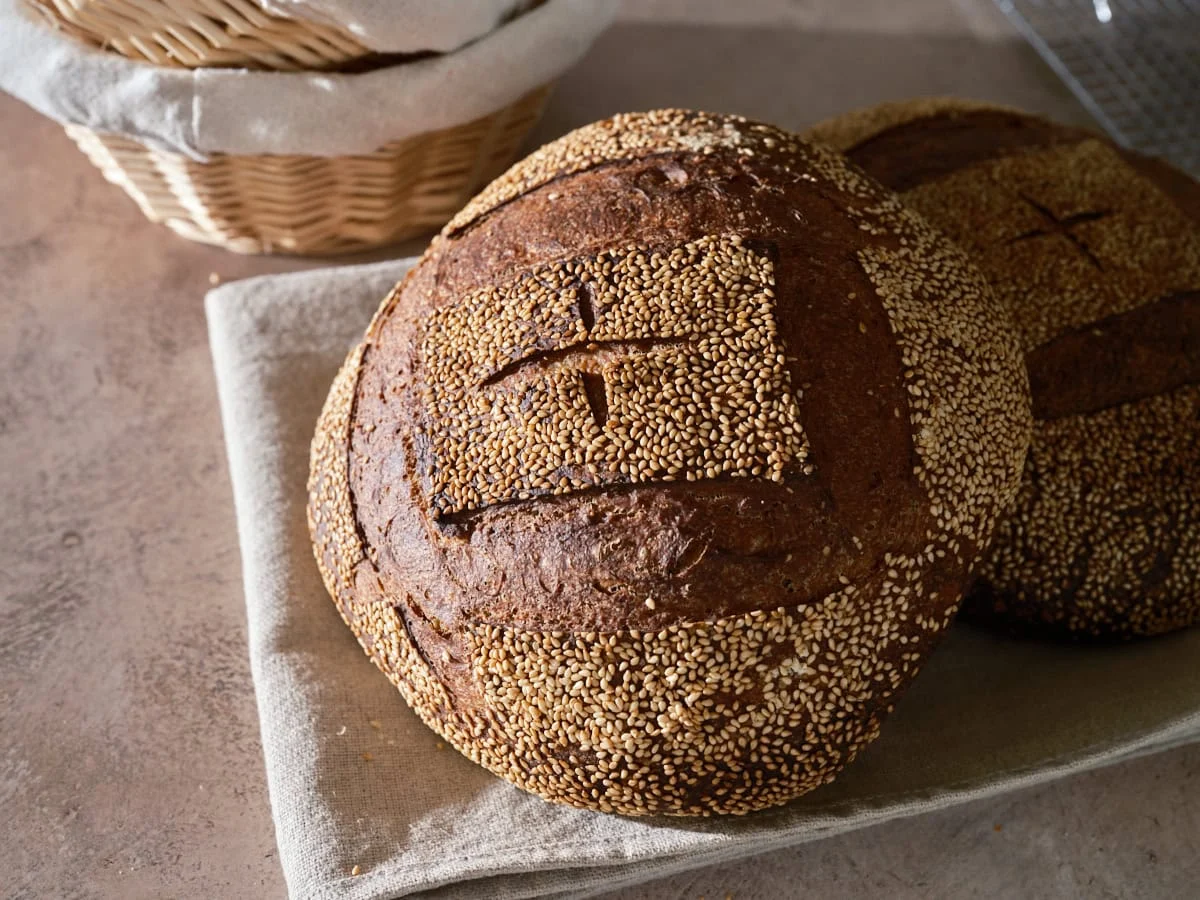
Anise, a spice that announces its presence with an undeniable boldness, is a favored ingredient for its distinctive licorice-sweet character. Its potent fragrance, often described as arriving rather than politely waiting to be noticed, adds a unique dimension to baked goods. While whole anise seeds have found their way into various recipes, including sourdough discard biscotti, and ground anise is a staple in many cookies, its inclusion in a large loaf of bread had been an unexplored territory until now. The pairing of this assertive spice with the earthy, mineral, and subtly tannic notes of buckwheat creates a sourdough bread that is both remarkably balanced and undeniably irresistible. To further enhance its visual appeal and complement its flavor profile, the loaf is finished with a generous topping of striking white sesame seeds, their mild nuttiness harmonizing beautifully with the bread’s inherent spices and sweetness.
The Science Behind the Flour Scald
The inclusion of buckwheat in this recipe was a deliberate choice, inspired by a desire to infuse the bread with a unique depth of flavor and texture. The technique of scalding flour, a process involving the simple application of boiling water to flour, is key to achieving these desired qualities. This method gelatinizes the starches in the flour, transforming it into a thick, paste-like consistency that is then incorporated into the final dough. This process bears a strong resemblance to the Yudane technique, and is closely related to the Tangzhong method, both of which are renowned for their ability to enhance bread’s texture and shelf life.
The resulting flour scald is intensely aromatic and flavorful. More importantly, it plays a crucial role in the final bread’s structure and longevity. By trapping moisture within the dough, the scald effectively delays the staling process, ensuring that the loaf remains softer for an extended period. This seemingly simple step adds a discernible "something extra" to each bake, elevating it beyond the ordinary.
Flour Selection: A Foundation for Heartiness
The intention behind this sourdough loaf was to create a hearty, spicy, and versatile bread, ideally suited for sandwiches. To achieve this, a high-extraction flour, specifically Type 85, was chosen as the base. Cairnspring’s Trailblazer flour, a consistent performer in the baker’s repertoire, was selected for its ability to replace standard white flours in many applications. Its higher content of bran and germ contributes a richer flavor and increased nutritional value to the final product.
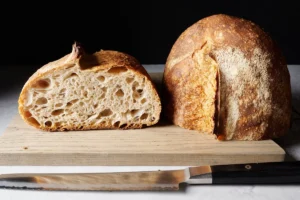
Buckwheat, while offering a unique earthiness and a beautiful hue, presents certain baking characteristics. Based on prior experience, even small percentages of buckwheat can lead to a tighter crumb structure due to its lack of gluten-forming proteins, which differ significantly from wheat. However, this is a trade-off for the intense, earthy flavor and striking color it imparts, making it a worthwhile inclusion.
A Deliberate Baking Schedule for Optimal Flavor
This sourdough bread recipe is designed to be executed over a two-day period, minimizing the need for constant baker intervention. The initial phase involves a period of bulk fermentation, during which the dough develops its structure and flavor. Periodically checking on the dough and performing a few sets of stretches and folds is all that is required. Following shaping, the dough undergoes a cold proof in the refrigerator overnight, a crucial step for developing complex flavors and achieving an optimal oven spring. The following day, the loaves can be baked in the morning for immediate enjoyment, or they can remain in the refrigerator until the evening, providing a fresh loaf for dinner. This staggered approach allows for flexibility and ensures that the bread is at its peak when desired.
Vitals and Formula Breakdown
This recipe yields two substantial loaves, each weighing approximately 900 grams. For bakers wishing to make a single loaf, all ingredients can be halved. A comprehensive, editable spreadsheet for scaling the recipe is available to members of The Baker’s Corner, facilitating precise adjustments for any batch size.
The overall dough weight for two loaves is 1,800 grams. The prefermented flour content stands at 5.8%, with the levain comprising 18.5% of the final dough. The hydration level is a notable 75.0%, which increases to approximately 83% when the water within the flour scald is accounted for. This higher hydration contributes to the bread’s tender crumb and excellent keeping qualities.
A target final dough temperature of 78°F (26°C) is recommended for this recipe. For a detailed discussion on the significance of dough temperature in baking and related factors, bakers are encouraged to consult the dedicated post on the importance of dough temperature.
Total Formula for Two Loaves:
| Weight (g) | Ingredient | Baker’s Percentage (%) |
|---|---|---|
| 46 | Scald: Buckwheat flour | 5.0% |
| 73 | Scald: Water | 8.0% |
| 687 | High-extraction wheat flour (Type 85) | 75.0% |
| 183 | Whole wheat flour | 20.0% |
| 46 | Barley malt syrup | 5.0% |
| 6 | Aniseed, ground | 0.6% |
| 596 | Water 1 (levain and autolyse) | 65.0% |
| 92 | Water 2 (mix) | 10.0% |
| 18 | Fine sea salt | 2.0% |
| 53 | Ripe sourdough starter, 100% hydration | 5.8% |
Method: Crafting the Scalded Buckwheat and Malt Sourdough
1. Prepare the Levain (9:00 a.m.)
The levain, the heart of any sourdough, is prepared using the following proportions:
| Weight (g) | Ingredient | Baker’s Percentage (%) |
|---|---|---|
| 53 | High-extraction wheat flour | 100.0% |
| 53 | Water 1 (levain) | 100.0% |
| 53 | Ripe sourdough starter, 100% hydration | 100.0% |
Combine these ingredients in a clean jar and allow them to ripen at a warm room temperature of 74-76°F (23-24°C) for approximately three hours. For those seeking to adjust the levain quantity, a dedicated sourdough starter and levain calculator is available.
2. Prepare the Flour Scald (9:10 a.m.)
This step involves combining the buckwheat flour and boiling water:
| Weight (g) | Ingredient |
|---|---|
| 46 | Buckwheat flour |
| 73 | Water, boiling |
Pour the boiling water over the buckwheat flour in a small bowl, stirring vigorously until a thick paste forms. If the mixture appears too dry, a small additional splash of boiling water can be added. The resulting paste should be smooth and homogenous. Cover the bowl and set aside to cool slightly until needed for the main dough mixing. This scald is highly aromatic and contributes significantly to the bread’s unique flavor profile.
3. Autolyse (11:00 a.m.)
The autolyse stage allows the flour and water to begin hydrating and developing gluten, setting the foundation for a well-structured dough.
| Weight (g) | Ingredient |
|---|---|
| 634 | High-extraction wheat flour |
| 183 | Whole wheat flour |
| 543 | Water 1 (autolyse) |
| All | Flour scald (from Step 2) |
Utilize a water temperature calculator to ensure the autolyse water is at the correct temperature to achieve the target final dough temperature of 78°F (25°C). In a large bowl, combine the flours, autolyse water, and the prepared flour scald. Mix with wet hands or a mixer on low speed until no dry bits of flour remain. The dough at this stage will appear shaggy and somewhat loose. Scrape down the sides of the bowl to consolidate the dough. Cover the bowl and let it rest for one hour. During this time, the dough will become more hydrated and develop strength.
4. Mix the Dough (12:00 p.m.)
This stage incorporates the remaining ingredients and develops the dough’s final structure.
| Weight (g) | Ingredient |
|---|---|
| 92 | Water 2 (mix) |
| 18 | Fine sea salt |
| 159 | Ripe levain |
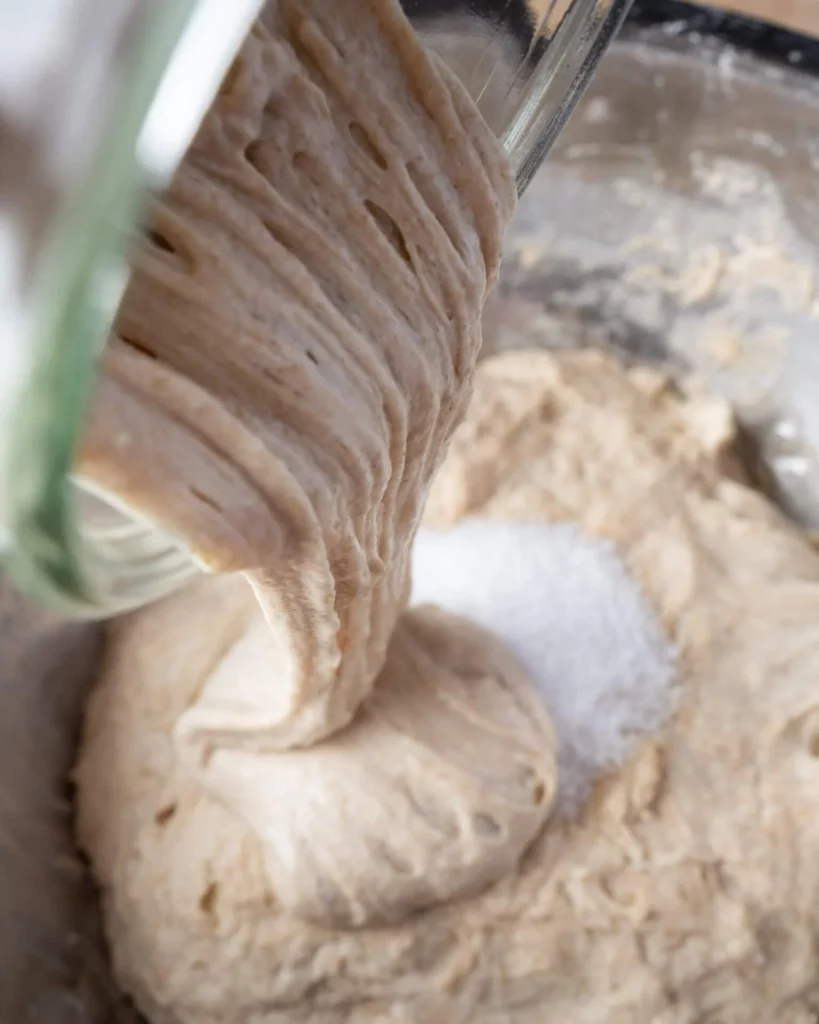
It is important to note the high hydration of this dough, which will make it feel slack and sticky. Water 2 is held back and added gradually using the bassinage technique, ensuring the dough does not become overly wet.
Mixing with a Mechanical Mixer: For those using a spiral mixer, the dough can be developed in phases after the autolyse. This methodical approach helps to properly integrate the ingredients and build gluten structure without overworking the dough.
Mixing by Hand: To mix by hand, add the salt and levain to the top of the autolysed dough, along with a splash of Water 2 to aid in incorporation. Mix thoroughly with wet hands or a dough whisk. Subsequently, knead the dough for several minutes using either the slap-and-fold technique or the folds-in-the-bowl method until the dough becomes smooth and cohesive. For this particular dough, approximately 5 minutes of kneading is sufficient. Transfer the dough back to the bowl, cover, and allow it to rest for 10 minutes. If the dough feels excessively wet, refrain from adding any remaining Water 2. If it remains shaggy but cohesive, incorporate the remaining water and mix until absorbed. Finish by performing slap-and-folds on a lightly floured surface for another 3-5 minutes, or utilize the bowl-folding method to achieve a smoother, more cohesive dough. Transfer the dough to a bulk fermentation container and cover.
5. Bulk Fermentation (12:30 p.m. to 3:30 p.m. – 3 hours)
Bulk fermentation, conducted at a warm room temperature of 74-76°F (23-24°C), typically lasts for about three hours. This phase requires two sets of stretch and folds, administered at 30-minute intervals. The first set involves stretching one side of the dough up and over to the opposite side, rotating the bowl 180 degrees for another stretch and fold, followed by a 90-degree rotation and a third stretch and fold. A final 180-degree rotation and a fourth stretch and fold complete the process. Cover the dough. A second set of stretch and folds is performed after another 30 minutes. After the second set, allow the dough to rest, covered, for the remainder of the bulk fermentation period. By the end of bulk fermentation, the dough should appear smooth, puffy, and have increased in volume by approximately 30%.
6. Pre-shape (3:30 p.m.)
Gently turn the dough out onto a clean work surface. Divide the dough in half and perform a gentle pre-shape on each portion, forming them into loose rounds. Allow these rounds to rest, uncovered, for 30 minutes. This resting period allows the gluten to relax, making the final shaping easier.
7. Shape (4:00 p.m.)
Prepare a clean kitchen towel or a quarter-sheet pan by spreading an even layer of raw white sesame seeds. The "gather up" shaping method is recommended for this dough. Flour the tops of the rested rounds. Using a bench scraper, flip one round onto a lightly floured surface. Fold two opposing points of the dough into the center, overlapping them slightly. Repeat with the remaining two opposing points. Invert the dough and use your hands to pull it towards your body, creating tension on the top surface. This should result in a smooth, round shape. Gently scoop the dough with both hands and invert it onto the prepared sesame seeds. Carefully transfer the shaped dough, seam-side up, into a 10-inch round proofing basket. Repeat the shaping process for the second piece of dough.
8. Proof (4:15 p.m. to 9:00 a.m. the following day)
Cover the proofing baskets with reusable plastic bags, sealing them to prevent the dough from drying out. Place the baskets in the refrigerator for an overnight cold proof. This extended cold fermentation is crucial for developing the sourdough’s characteristic flavor and texture.
9. Bake (9:00 a.m.)
Preheat the oven to 450°F (230°C) with a baking rack positioned on the bottom third. Place a Dutch oven, combo cooker, or baking stone/steel on the rack. An additional pan at the bottom of the oven can be used for creating steam by adding ice cubes.
Remove one proofing basket from the refrigerator. Uncover the dough and place a piece of parchment paper over the basket. Invert a pizza peel or baking sheet onto the parchment paper, and carefully flip the entire assembly over. Gently remove the proofing basket and score the dough.
Slide the dough into the preheated oven. Create steam by covering the Dutch oven or adding ice to the bottom pan. Bake for 20 minutes. Then, vent the oven by removing the lid from the Dutch oven or the steaming pan. Continue baking for another 30 minutes, or until the loaf achieves a deep golden-brown color and an internal temperature of approximately 204°F (95°C). Repeat the baking process for the second loaf. Allow the baked loaves to cool on a wire rack for at least one to two hours before slicing to ensure the interior is fully set.
Frequently Asked Questions
What can I use instead of aniseed?
Caraway seeds offer a comparable spice profile and would be an excellent substitute for aniseed in this recipe.
What can I use instead of barley malt syrup?
For a more pronounced bitter and sweet flavor, blackstrap molasses is a suitable alternative. Alternatively, honey can be used to impart a more floral sweetness that pairs well with anise.
Culinary Considerations and Broader Impact
The development of this Scalded Buckwheat and Malt Sourdough Bread represents a thoughtful exploration of flavor and texture within the realm of artisanal baking. The use of a flour scald, a technique rooted in traditional baking practices, highlights a growing interest in methods that enhance both the quality and shelf-life of bread. The incorporation of buckwheat, a nutrient-dense ancient grain, aligns with contemporary dietary trends emphasizing whole grains and unique flavor profiles.
The recipe’s structured, two-day approach caters to modern lifestyles, allowing for busy schedules while still yielding a superior product. The cold proofing stage, a cornerstone of sourdough baking, is instrumental in developing the complex tang and nuanced flavors that distinguish this bread. The inclusion of visual aids and detailed step-by-step instructions further democratizes the art of sourdough, making it accessible to a wider range of bakers.
The implications of such recipes extend beyond individual kitchens. They contribute to the broader culinary landscape by encouraging experimentation with heritage grains and time-honored techniques. The resulting bread, with its distinct taste and texture, offers a compelling alternative to mass-produced loaves, fostering a greater appreciation for the craft of baking and the quality of ingredients. As consumers increasingly seek out authentic and flavorful food experiences, breads like this Scalded Buckwheat and Malt Sourdough are poised to play a significant role in shaping future culinary trends.