The desire for a larger oven is a common, almost inevitable, progression for dedicated home bakers. It marks a transition from casual enthusiasm to a serious commitment to the craft, where the limitations of standard kitchen equipment become a tangible barrier to ambition. This was precisely the juncture where I found myself, dreaming of effortlessly baking six loaves at a time – a modest ambition by professional bakery standards, yet a significant leap for a home kitchen. As the volume of dough handled increases, the yearning for tools that enhance efficiency becomes paramount. While baking substantial quantities of bread in a home setting is certainly achievable, as demonstrated by many skilled bakers, having the right equipment liberates the baker to focus on the nuances of flavor development, fermentation, dough handling, and shaping. For me, the Rofco oven emerged as the natural next step in this evolving baking journey.
For those who embark on the path of expanding their home baking endeavors, this point of scaling up can be reached through a gradual, yet relentless, obsession. Some bakers may choose to transform their passion into a nano or micro-bakery, while others might venture into selling their wares at local farmers’ markets. Regardless of the impetus for scaling up, this guide aims to serve as a comprehensive resource, consolidating the essential tools, optimal temperatures, precise timings, and other valuable tips I’ve gathered through extensive experience with my Rofco bread oven. Furthermore, it’s designed to assist prospective buyers in determining if a Rofco oven aligns with their needs, or to provide a foundational understanding for those who have recently acquired one, enabling them to confidently initiate its use and eventually develop their own specialized baking processes.
Understanding the Rofco Bread Oven
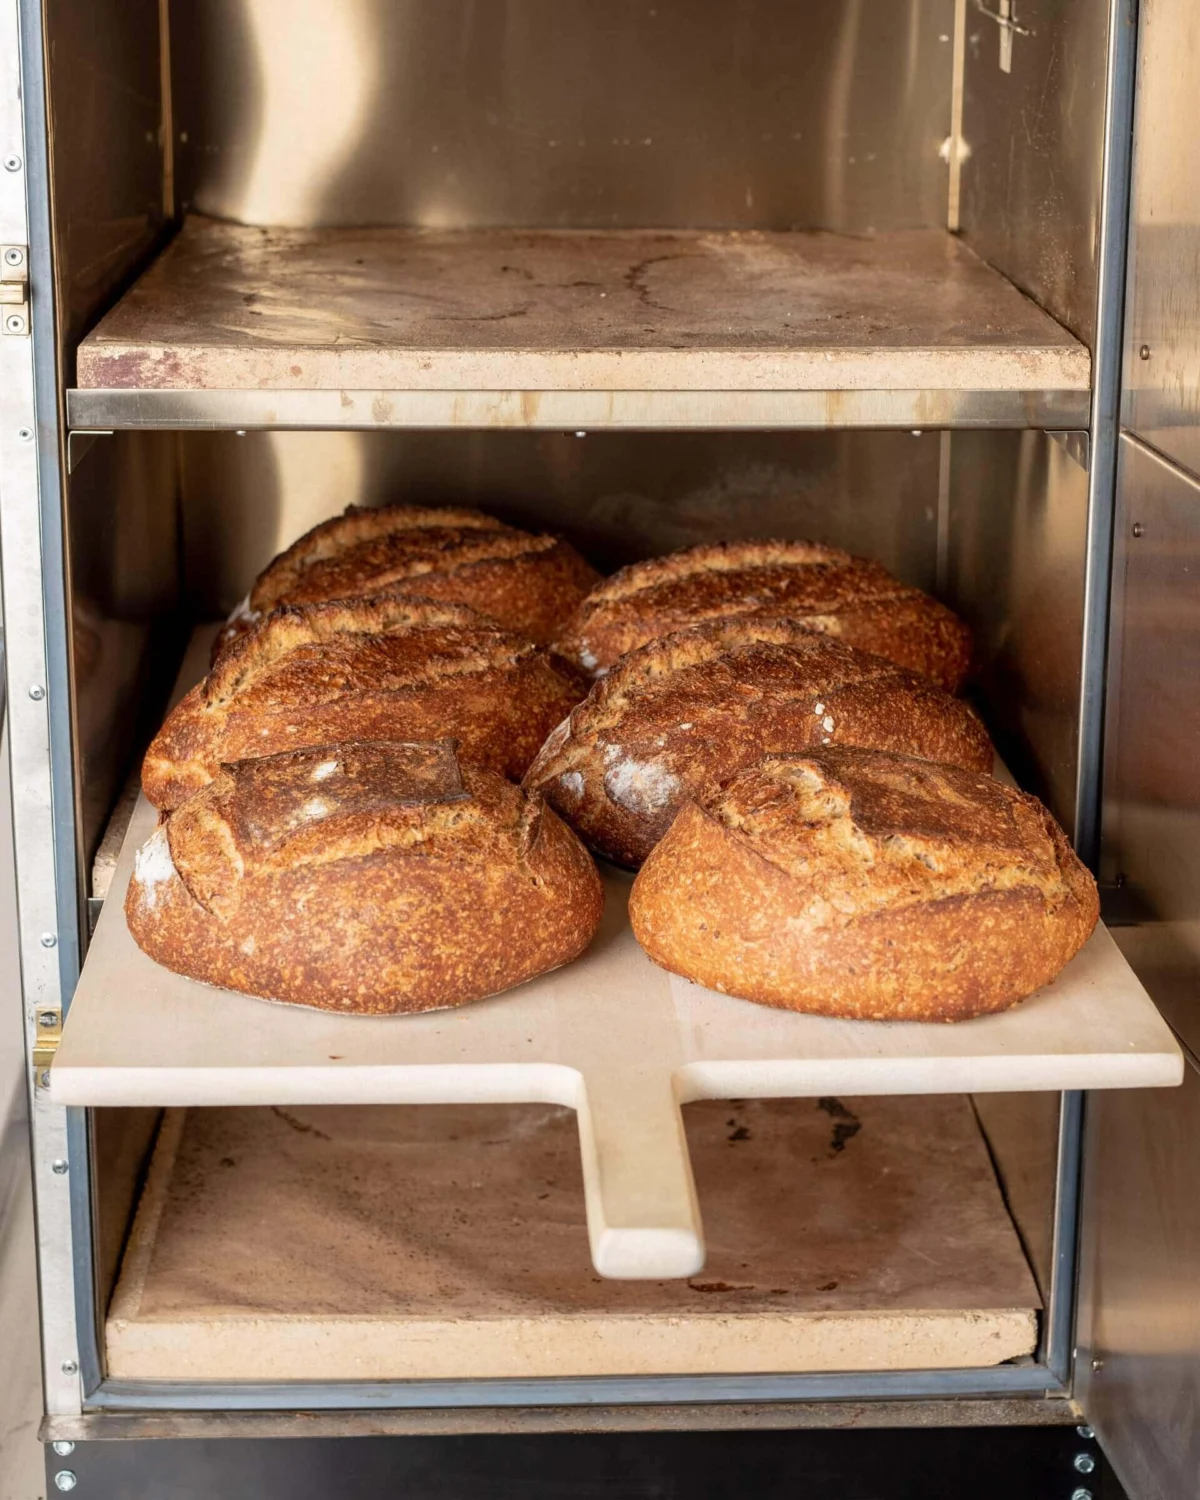
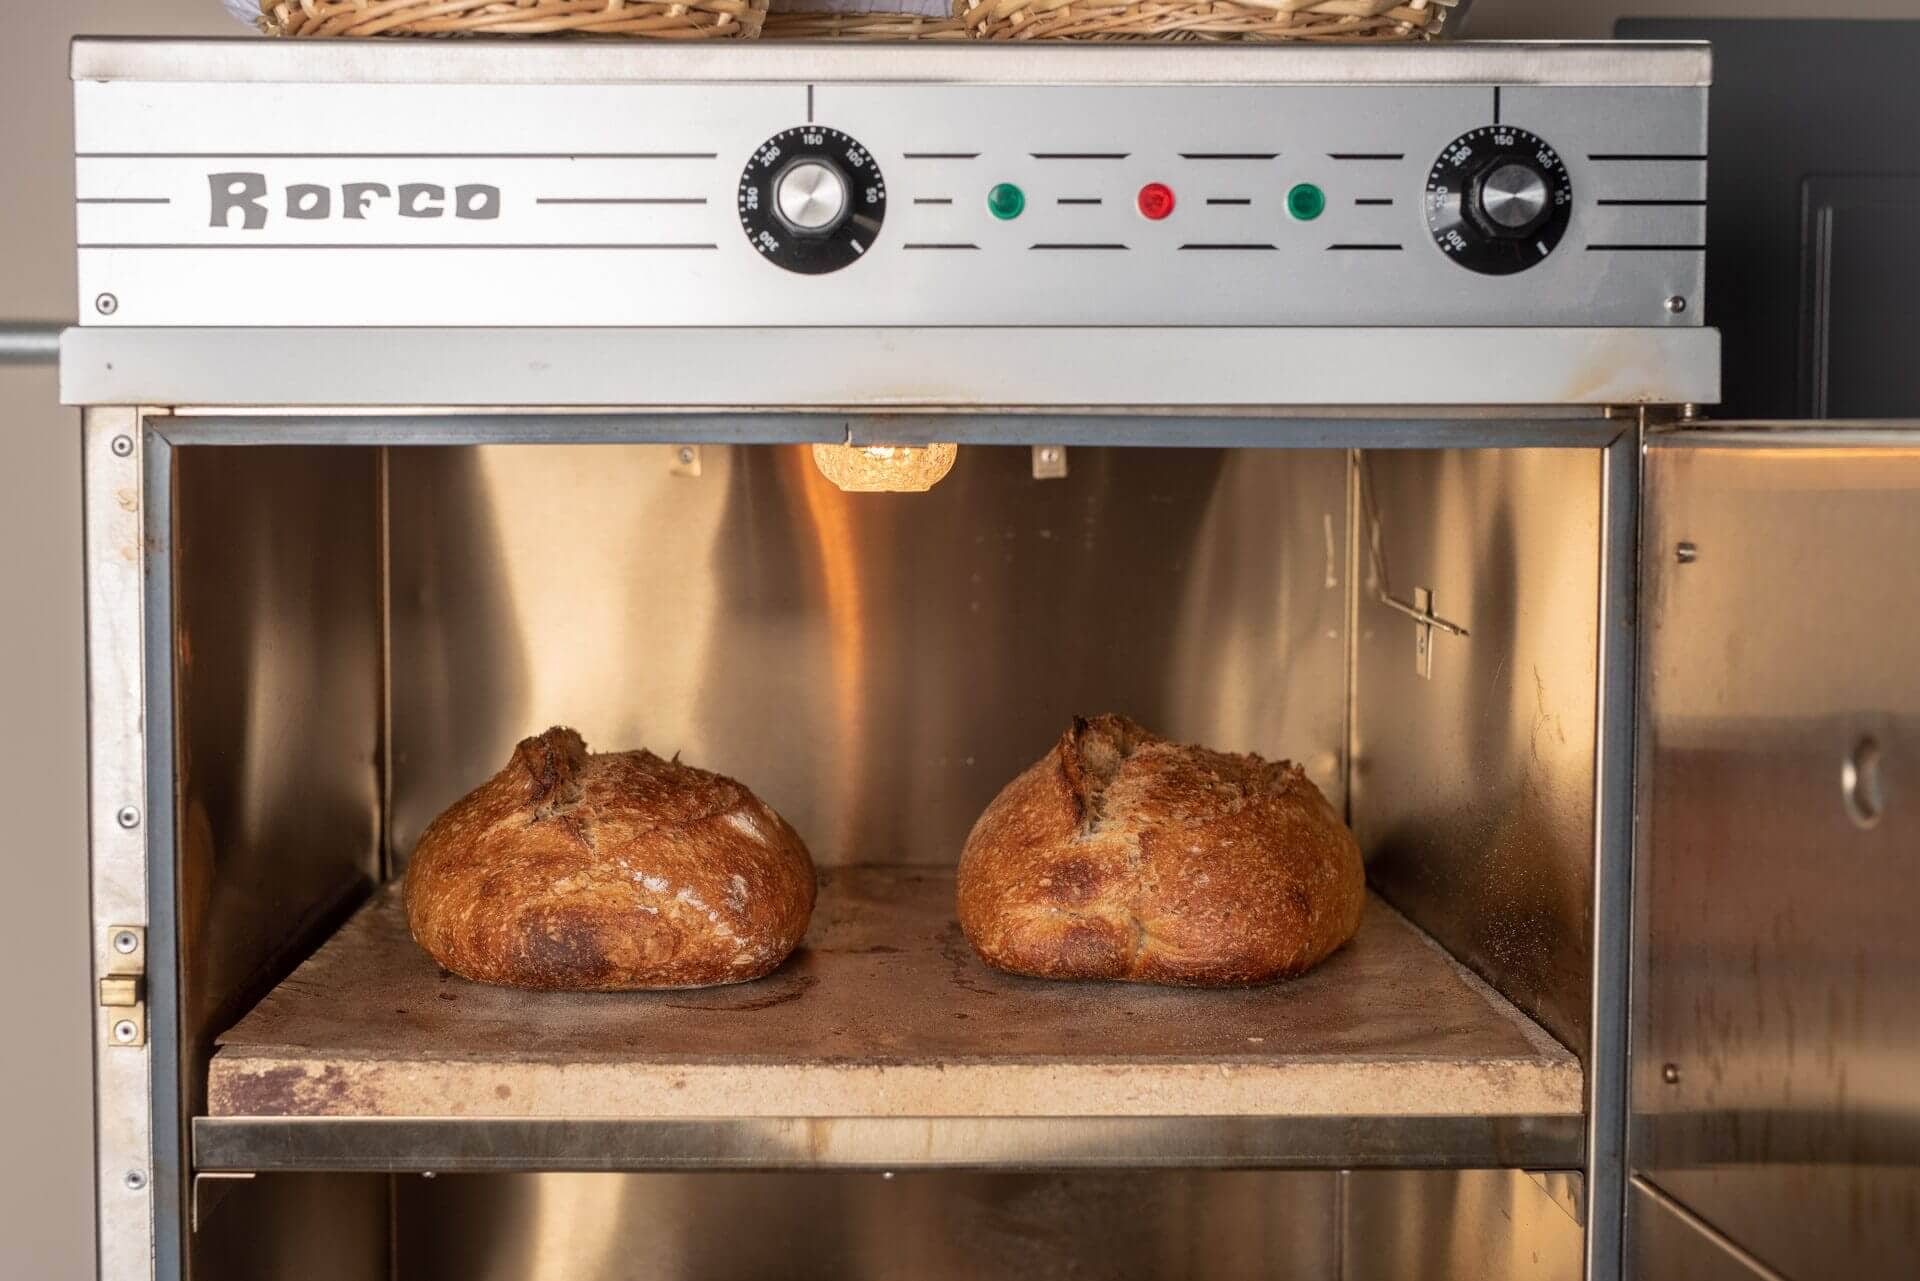
The Rofco is a specialized, Belgian-manufactured brick oven meticulously engineered for the art of bread baking. Available in a range of sizes, my personal choice is the largest model, the B40, which features three expansive square baking decks. This oven is characterized by its compact yet robust construction and a fully sealed oven chamber. A notable advantage is its minimal external radiant heat emission, allowing for placement in close proximity to walls or other appliances without posing a significant safety risk, despite the exterior reaching elevated temperatures. The oven’s three chamotte deck stones, each measuring 1-3/8 inches thick, are exceptional at retaining heat. This thermal mass ensures consistent baking temperatures even after repeated door openings for loading, a crucial factor for maintaining oven performance. The Rofco’s capacity to retain heat for extended periods makes it remarkably efficient for multiple consecutive baking sessions, requiring only brief rest intervals to return to optimal temperature.
The Rofco operates on standard 220V AC single-phase power, a common electrical supply found in most households, typically utilizing a 6-20P cord and a 6-20R receptacle. For its installation, it was necessary to engage an electrician to outfit my home’s breaker box with a dedicated circuit and receptacle specifically for the oven.
In practice, the Rofco has proven invaluable for baking large-scale batches for events such as festivals and parties. However, its daily utility often lies in baking batches of 4-6 loaves. Its efficiency and convenience are undeniable. It stands as a no-frills, dependable workhorse, delivering precisely what is needed, when it is needed.
My acquisition of this oven was facilitated by Pleasant Hill Grain in the United States, an establishment renowned for its exceptional customer service. Their responsiveness to my inquiries, even regarding a minor issue with a door clasp, has been consistently outstanding. It is worth noting that I received a discount on this oven from Pleasant Hill Grain; however, this guide is independently authored, reflecting my genuine experiences and insights without their direct involvement or any expectation of endorsement.
A Resounding Recommendation for the Rofco Bread Oven
To be unequivocally clear: I wholeheartedly endorse the Rofco bread oven. It represents a superb piece of equipment, particularly for home bakers aspiring to produce more than just a couple of loaves at a time. Its ingeniously simple design, coupled with easily repairable components and its ability to deliver consistently even baking, makes it an outstanding choice for both dedicated home bakers and nascent professional bakers.
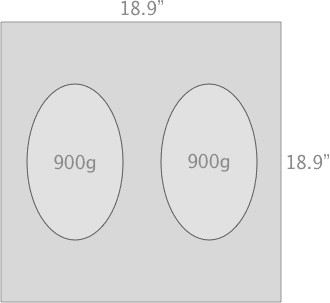
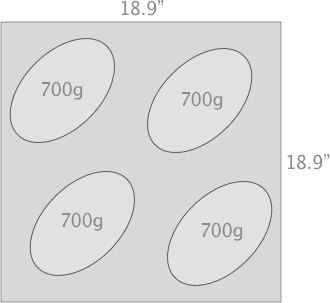
Optimizing Dough Placement for Superior Baking
A key aspect of maximizing output in the Rofco is akin to a culinary game of Tetris: arranging the dough to bake the greatest quantity without any loaves touching, while still ensuring an even bake across all items. While my personal baking volume doesn’t frequently push the absolute limits of this capacity, I have observed and learned from bakers who have mastered this art. The following diagrams illustrate three common dough arrangements for the typical home baking scenarios I encounter, with the leftmost configuration (two 900g batards per deck) representing my most frequent baking pattern.

It is important to note that the oval shapes in the diagrams denote my standard batard form, while the circular shapes represent boules. Each deck within the Rofco B40 measures 18.9 inches by 18.9 inches. For reference, the top edge of each square in the diagram corresponds to the rear of the oven, and the bottom edge indicates the front, where the door is located.
- Configuration 1: Two 900g Batards per Deck
This arrangement allows for ample space between loaves, promoting excellent oven spring and even crust development. - Configuration 2: Two 800g Boules per Deck
This configuration is ideal for round loaves, ensuring sufficient room for expansion. - Configuration 3: Four 700g Loaves per Deck
This demonstrates the oven’s capacity for higher volume, fitting four smaller loaves, though careful spacing is crucial.
The Rofco is also equipped with square steel trays, which are highly effective for baking smaller items such as buns, rolls, or even large square pizzas. I find these trays particularly useful when baking goods other than traditional bread loaves. They simplify the process of transferring multiple small items into the oven and effectively contain any potential spills.
Mastering Steam Infusion in the Rofco
As previously detailed in my guides on Dutch oven baking, the application of steam at the commencement of the baking process is fundamental to achieving optimal oven spring and a beautifully developed crust. A significant advantage of the Rofco is its fully sealed oven chamber, which prevents steam from escaping until the two front vents are deliberately opened. However, this is also where the Rofco differs from professional ovens that offer automated steam injection; manual steam generation is required. Fortunately, several effective methods exist to introduce sufficient steam into the oven for excellent bread results.
For those seeking a more in-depth understanding of steam’s role in bread baking, my comprehensive guide, "How to Steam a Home Oven for Bread Baking," offers further insights.
The High-Pressure Sprayer Method
My preferred technique for generating steam involves utilizing a commercial-grade pressure sprayer. Specifically, I recommend an electric spray bottle designed for this purpose, capable of delivering a consistent and fine mist. The sprayer should be set to its finest mist setting and filled with water. Once pressurized, the dough is loaded into the oven. Beginning with the bottom deck, approximately 10-12 seconds of spraying is applied, followed by the same treatment for the middle and top decks.
When spraying the top deck, it is imperative to avoid the glass enclosure of the oven light, as sudden temperature changes can cause the glass to crack – an occurrence I have experienced myself. After the initial spray, as the oven door is being closed, a second misting is applied to each deck before fully securing the door.

To vent the steam, the oven door is carefully opened (allowing the initial rush of steam to dissipate before leaning in), then briefly closed. Subsequently, the circular vents on the door are tilted to their open position.
Utilizing Optional Steam Pods
Rofco offers optional rectangular steam pods, designed to be preheated within the oven. These long, steel boxes are placed on the left and right sides of each deck. To generate steam, water or ice cubes are poured into these pods, and the oven door is closed. The resulting heat causes the water to rapidly vaporize, filling the oven chamber with steam. While these pods are effective at producing steam, they do occupy valuable deck space, which is a consideration when maximizing the number of loaves baked. I have experimented with these pods and found them to be functional, but given the limited space, I generally opt for the sprayer method. Once the water within the pods has fully evaporated, the steam can be vented by opening the circular vents on the oven door.
The Rofco Baking Process: A Step-by-Step Guide
The process of baking bread in a Rofco oven is one of continuous refinement, involving ongoing adjustments to times, temperatures, and procedural elements. While different dough formulations may necessitate variations, the following outlines my consistent, go-to process for the majority of recipes.
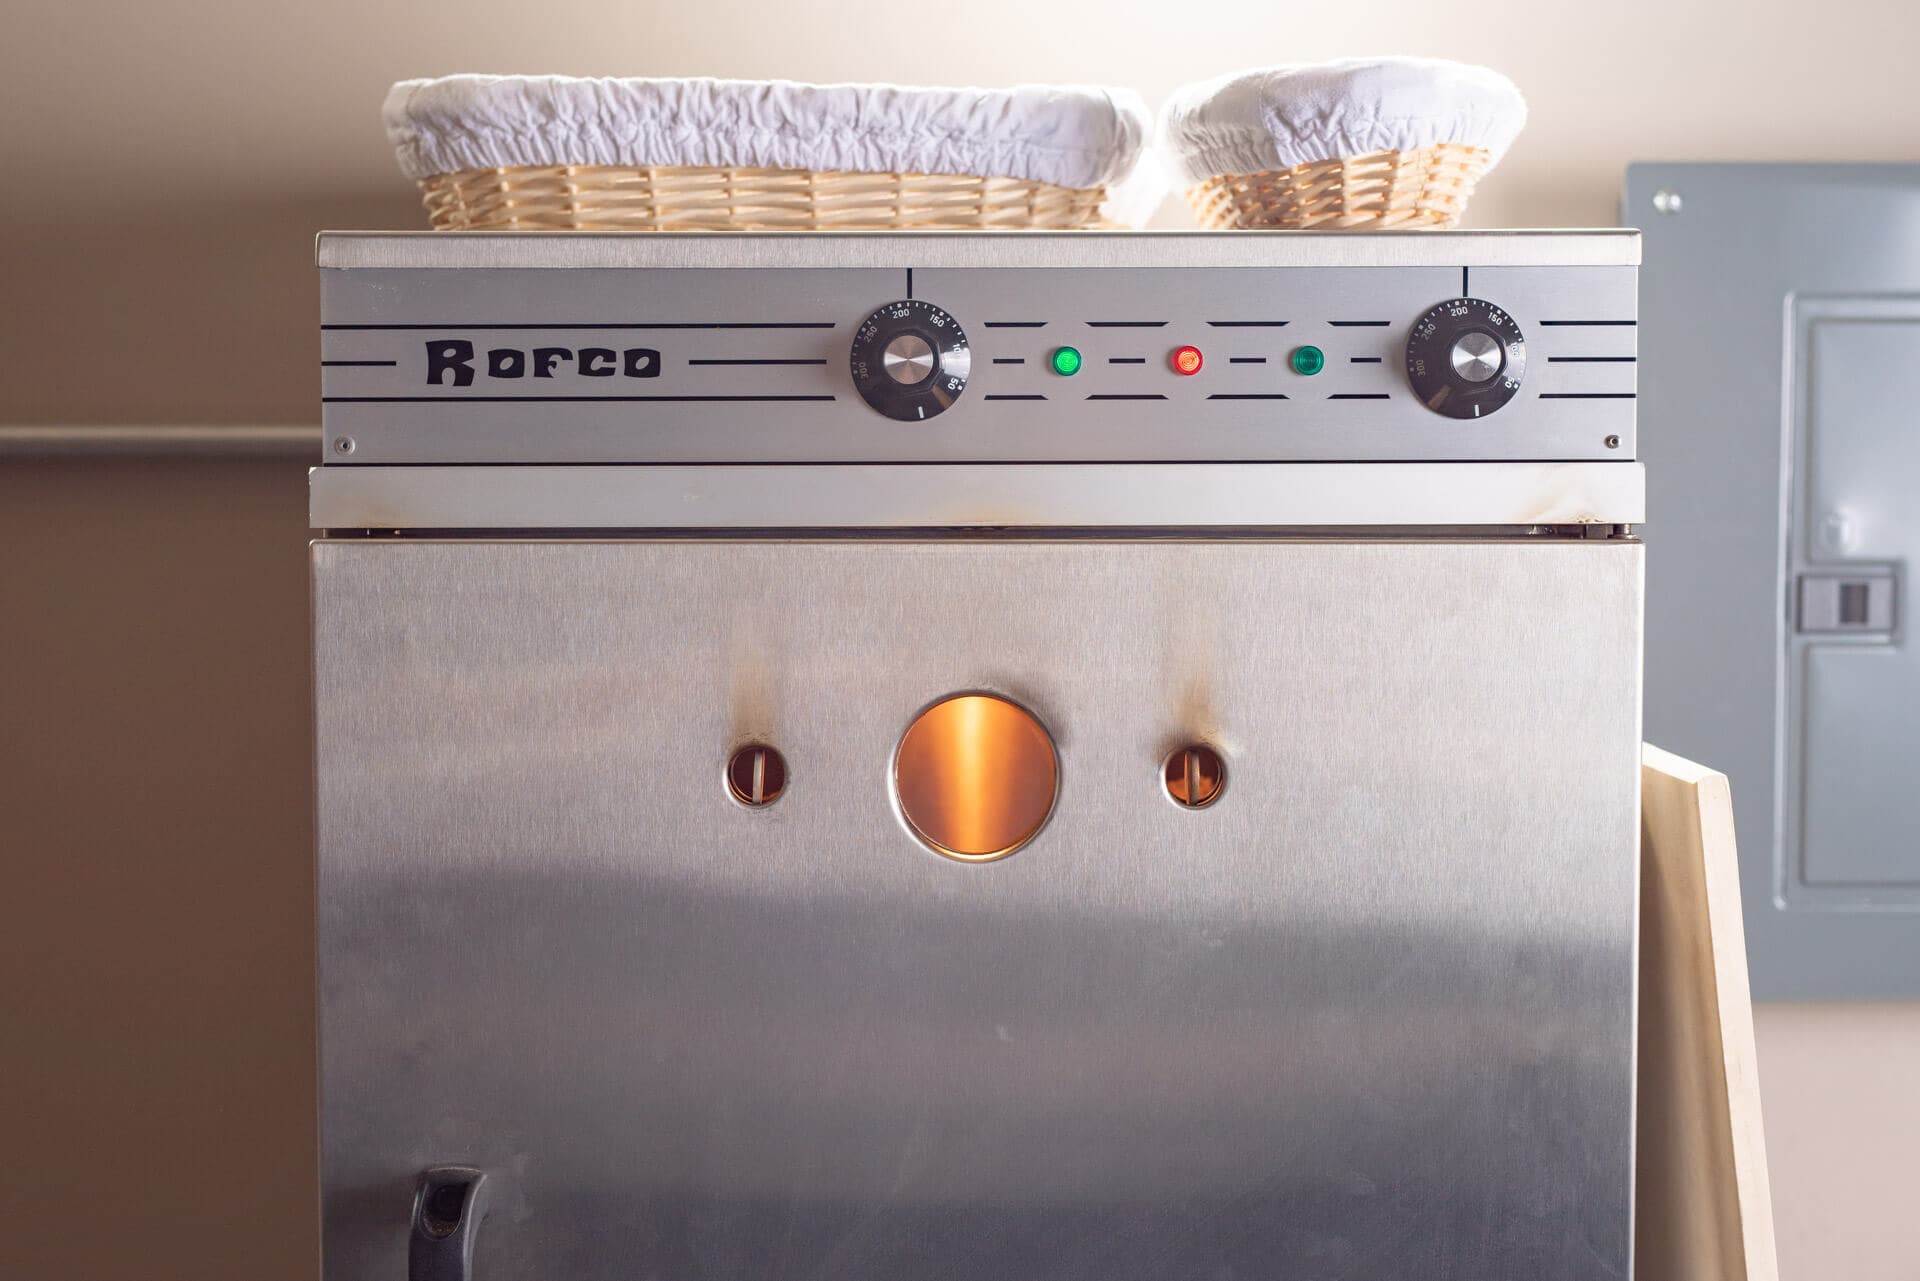
The oven controls consist of two knobs: the left knob regulates the top heating element, and the right knob controls the bottom heating element. Indicator lights illuminate to signify when each respective heating element is active.
Before initiating the preheating sequence, ensure the oven is completely empty, including any silicone sheets that may have been inadvertently left inside. Both the left and right control dials should be set to 240°C. A preheating period of 1.5 hours is recommended to ensure the refractory deck stones are thoroughly saturated with heat.
Once preheated, prepare your baking setup. Lay a pizza peel on a nearby surface, place a silicone sheet on top, and arrange the remaining silicone sheets in an assembly line beside it. Gently turn out your proofed dough onto the silicone sheets, score each loaf as desired, and then begin the loading process by sliding the first sheet with dough from the peel into the oven. Utilize the peel to transfer the subsequent sheets into the oven, following the assembly line until all dough has been loaded.

The baking process then proceeds as follows:
| Step | Description | Temperature | Duration |
|---|---|---|---|
| 1 | Preheat Oven: Ensure door and vents are closed. | 240°C | 1 hour 30 minutes |
| 2 | Initial Bake with Steam: Load dough, create steam (as described above). | 150°C | 20 minutes |
| 3 | Vent Steam and Increase Heat: Briefly open the door, open vents, and increase temperature. | 220°C | 10 minutes |
| 4 | Final Bake: Continue baking, reshuffling loaves if necessary for even browning. | 150°C | 20-30 minutes |
Upon completion of the baking cycle, the loaves and silicone sheets are carefully removed from the oven using the peel and placed on wire racks to cool. Following this, the oven is either turned off or reheated to 240°C if additional baking is planned, and the door is closed.
Essential Tools for Rofco Baking
To enhance the efficiency and effectiveness of baking with a Rofco oven, several key tools are highly recommended.

High-Performance Electric Sprayer for Steam Generation
For bakers who opt against using the Rofco’s steam pods, a high-quality electric spray bottle is an indispensable tool. Models like the Electric Spray Bottle are particularly effective, offering a significant improvement over manual pump sprayers. These compact devices can deliver a substantial volume of fine mist with the simple press of a button, creating an optimal steamy environment within the oven.
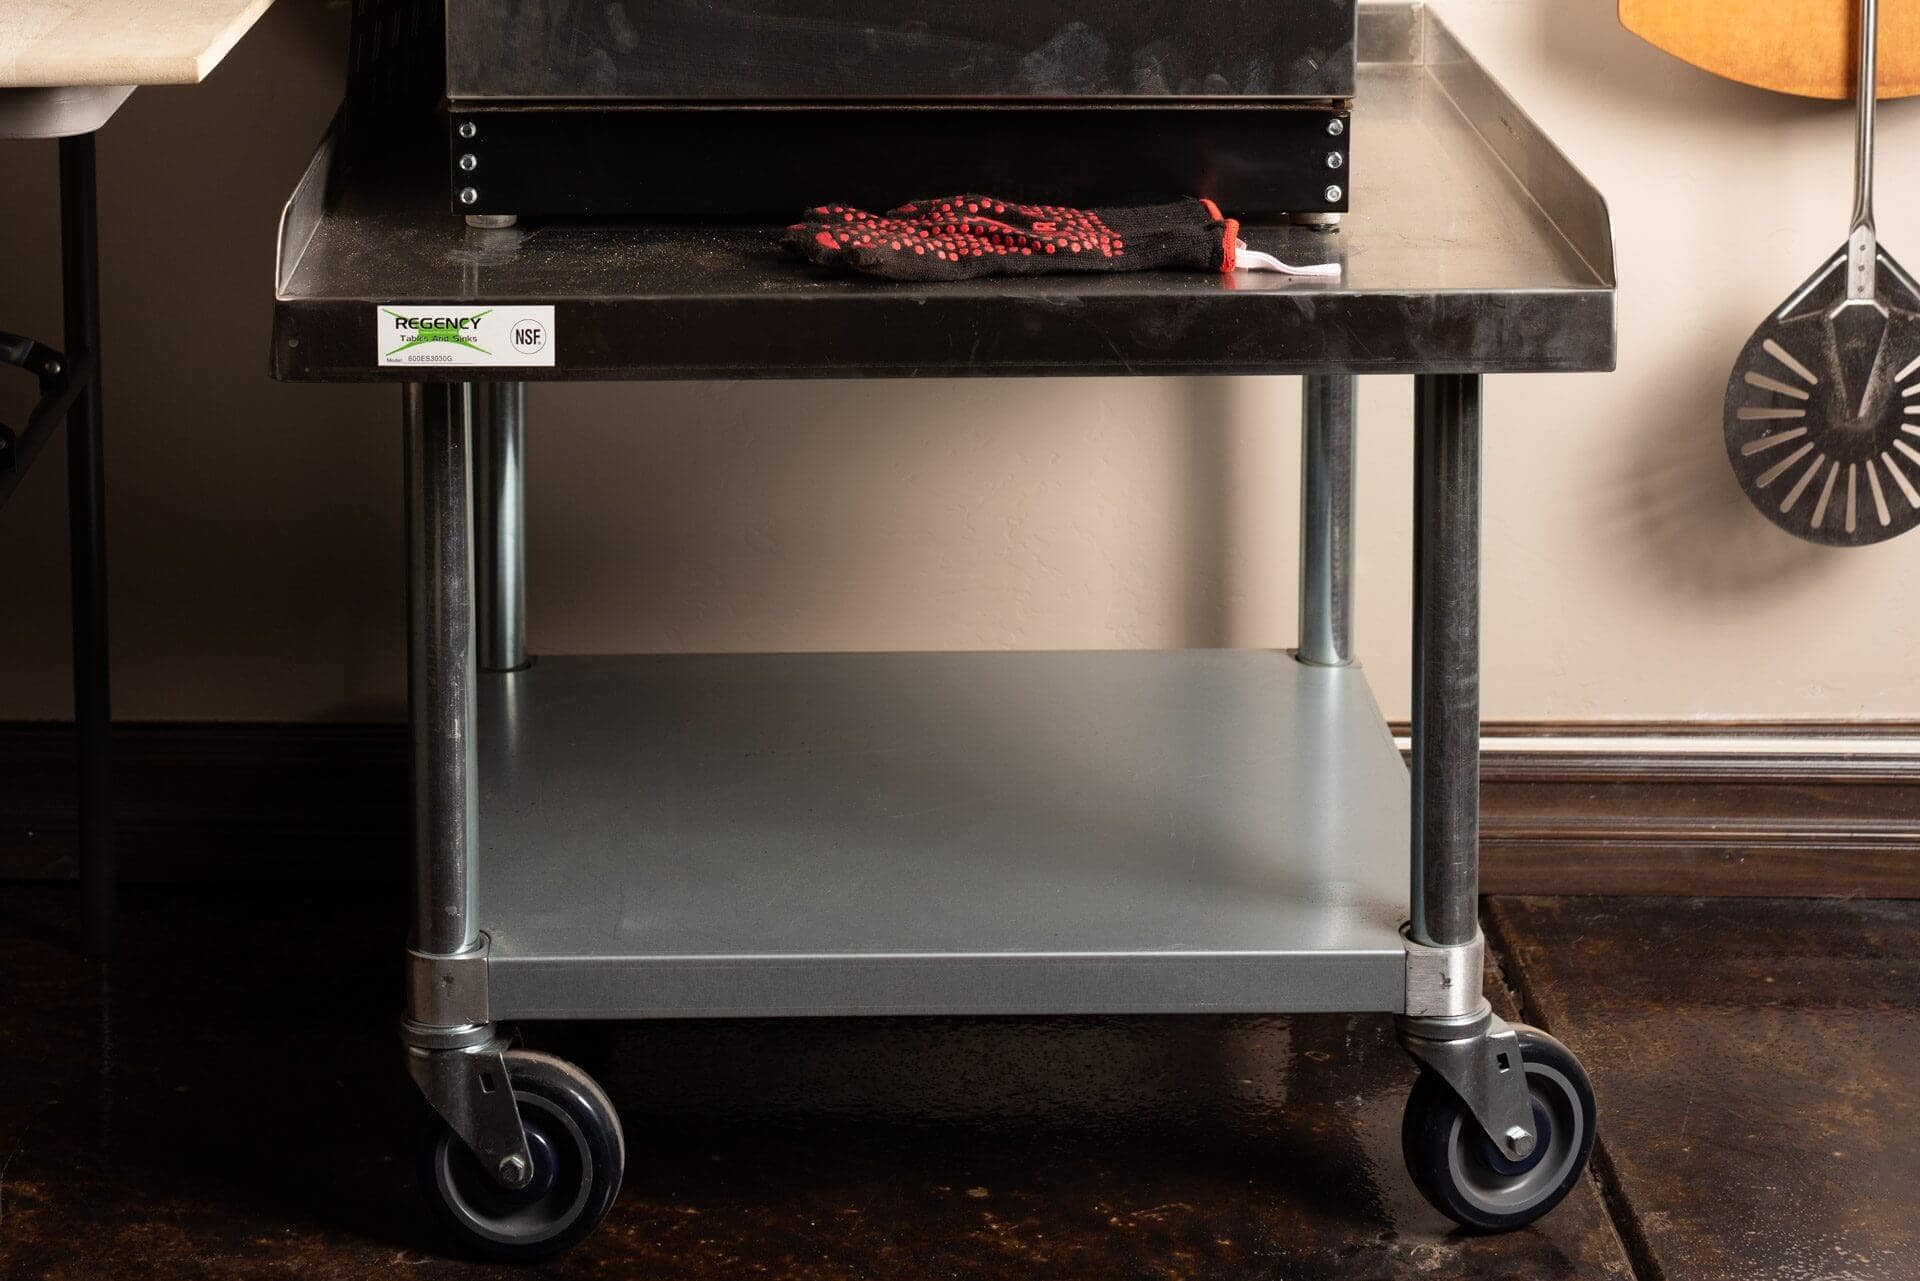
Elevated Oven Equipment Stand
Raising the Rofco oven to a more ergonomic height can significantly improve the user experience. A custom-cut stainless steel equipment stand, such as those available from WebstaurantStore, provides a sturdy and stable platform. The Regency 30" x 30" 16-Gauge Stainless Steel Equipment Stand is a robust option. Customizing the leg height, perhaps to around 18 inches, can achieve a comfortable working height for loading and unloading. The addition of locking casters can provide mobility if needed, although for maximum stability, fixed legs might be preferred.
Generously Sized Wooden Peel
While the Rofco B40 includes square steel baking trays, their utility for directly loading dough can be cumbersome. A large wooden pizza peel, such as the American Metalcraft 1836 model, offers a more practical solution. With dimensions of 18 inches by 29.5 inches, it is almost the exact width of the Rofco B40’s decks (18.9 inches). This peel is lightweight, durable, and ideal for transferring dough-laden silicone sheets into the oven. The process involves placing a silicone sheet on the peel, unloading the scored dough onto it, and then smoothly sliding the sheet into the oven.
Post-Baking Utility: Drying Proofing Baskets
An efficient practice after removing baked loaves is to utilize the residual heat of the Rofco oven for drying proofing baskets, also known as bannetons. Placing these damp baskets inside the warm oven quickly dries the liners or canvas, facilitating their immediate storage and significantly reducing the risk of mold formation.
Moving Forward: Continued Mastery of the Rofco
As with any new baking equipment, there might be a slight initial dip in baking consistency as one becomes fully acquainted with the Rofco oven’s unique characteristics. It is advisable to select a straightforward sourdough recipe and practice it consistently until a comfortable mastery of the new process is achieved. For those in the market for a Rofco oven, Pleasant Hill Grain is a highly recommended vendor, offering exceptional service and support.
For bakers looking to further professionalize their operations, exploring complementary equipment such as the Famag spiral dough mixer, capable of handling substantial dough batches, or the Ooni Halo Pro Spiral Mixer, suitable for smaller batches and microbakery testing, is a logical next step. Additionally, for those requiring even greater baking capacity, an oven like the RackMaster 2020 Bread Oven, featuring larger decks, warrants consideration.

Happy baking!