Dough hydration, a seemingly simple measurement in sourdough bread baking, reveals itself as one of the most intricate and dynamic aspects of the craft. This fundamental characteristic, representing the proportion of water to flour, dictates not only the texture and crumb of the final loaf but also the very handling properties of the dough itself. Mastering hydration is a journey of sensory feedback, a constant dialogue between the baker and the ingredients, influenced by an array of environmental and material factors.
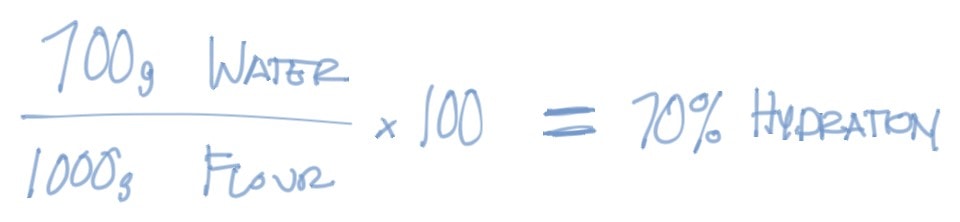
At its core, dough hydration is expressed as a percentage of the total flour weight. The calculation is straightforward: divide the weight of water by the total weight of flour and multiply by 100. For instance, a recipe calling for 1,000 grams of flour and 700 grams of water results in a 70% hydration dough (700 / 1,000 * 100 = 70%). This numerical guideline serves as an initial indicator of what to expect from the dough before mixing commences, offering a predictive measure for bakers.
However, experienced bakers understand that this percentage is a guideline, not an immutable law. Flour, the primary ingredient, is far from static. Its absorption capabilities vary significantly based on its type, milling process, and even the specific batch. Beyond the flour itself, environmental conditions play a crucial role. While dramatic shifts in humidity can influence dough consistency, even subtle daily changes can necessitate adjustments. A dough that feels perfectly manageable one day might require a different approach the next if atmospheric conditions have altered. This variability underscores the need for a more intuitive, hands-on approach to baking, moving beyond strict adherence to numerical recipes.
The significance of hydration lies in its profound impact on the final bread. Water is the transformative agent that converts dry flour into a living dough, capable of capturing the gases produced during fermentation. Insufficient water results in a dense, resistant dough, leading to a tight, heavy loaf. Conversely, an excess of water can render the dough unmanageable, a sticky, slack mass that struggles to hold its shape, potentially resulting in a gummy crumb or collapse.
Between these extremes lies a spectrum of possibilities, each yielding distinct bread characteristics. Lower-hydration doughs, typically in the 60-68% range, generally produce loaves with a substantial crust and a chewier interior. This is often the preferred range for breads like bagels, pretzels, and certain pizza doughs where a more robust structure is desired. These doughs are typically easier to handle, making them a good starting point for novice bakers.
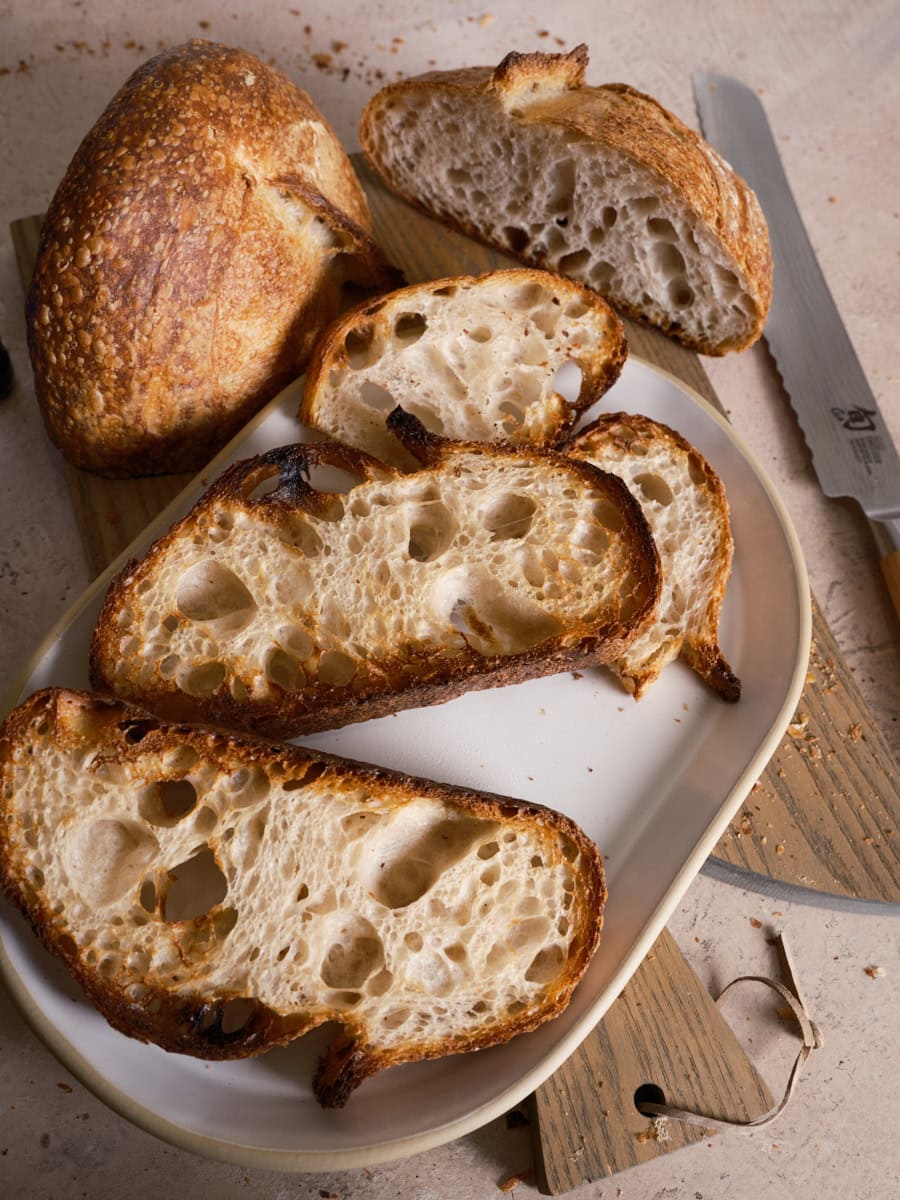
As hydration increases, so do the potential for a more open, tender crumb and a thinner crust. Doughs in the 75-85% range, for example, can yield loaves with a delicate, almost custardy interior, often sought after in artisanal breads like ciabatta and focaccia. However, these higher-hydration doughs demand greater skill in handling, shaping, and fermentation to achieve optimal results.
A common frustration for many home bakers is the perception that higher hydration automatically equates to superior bread. While increased water content can contribute to a desirable open crumb and tender texture, it is not a universal guarantee of quality. Pushing hydration to extreme levels without considering the flour type or the baker’s skill can lead to undesirable outcomes, such as a gummy crumb that fails to retain its structure or stales rapidly. The goal is to find a hydration level that maximizes the desired characteristics of the flour being used, without compromising volume, texture, or overall eating quality.
Understanding the Visual Cues of Dough Hydration
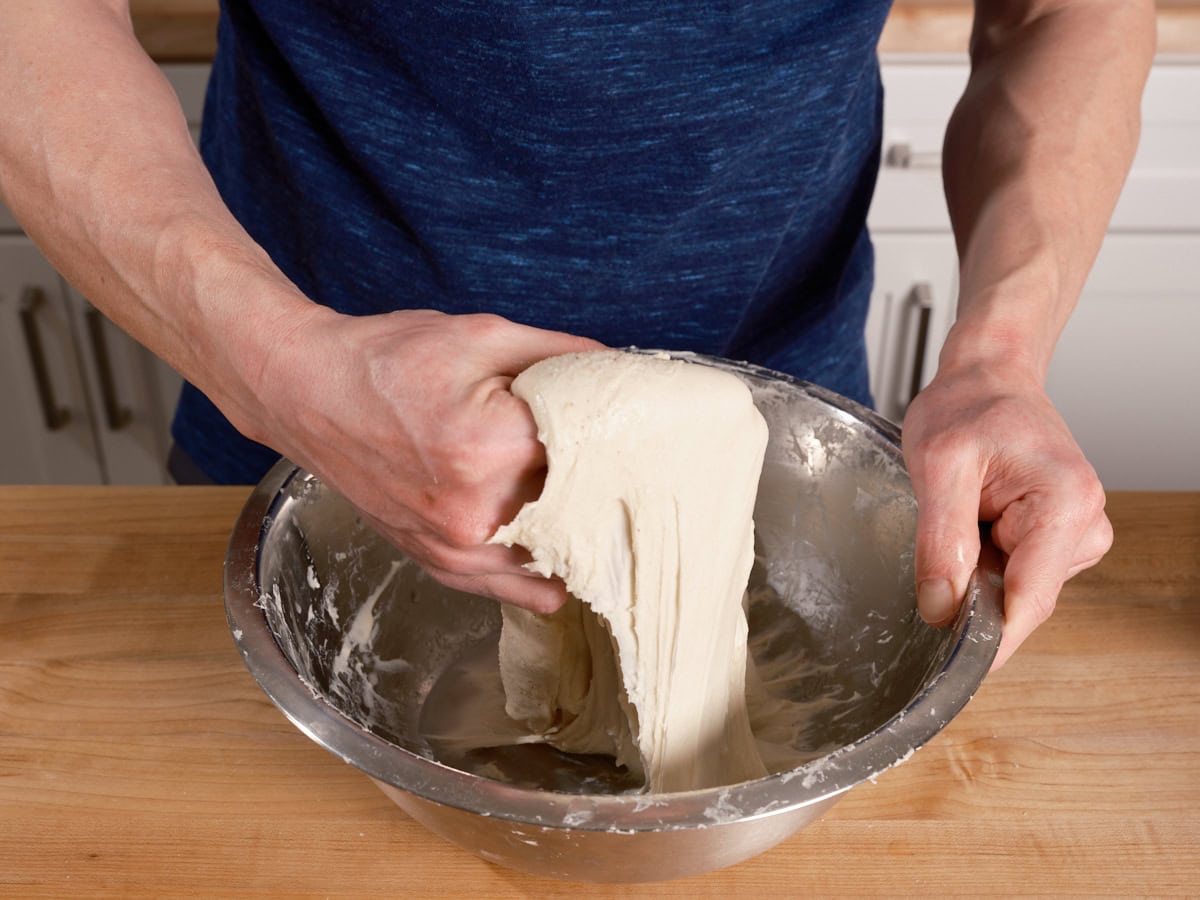
Beyond the numerical percentage, the most valuable skill a sourdough baker can develop is the ability to "read" their dough. The feel and appearance of the dough in the mixing bowl offer far more reliable information than a recipe’s hydration figure alone. A dough that feels wet and slack at 70% hydration with one type of flour might feel considerably stiffer with another. This sensory understanding is crucial for adapting recipes and troubleshooting issues.

To illustrate, consider the visual distinctions between doughs at different hydration levels:
Under-Hydrated Dough (~62% or less):
This dough will appear dry and crumbly, resisting cohesion. It will feel stiff and difficult to knead, often clinging to the sides of the bowl in distinct clumps rather than forming a smooth mass. Signs include a lack of elasticity, a tendency to tear rather than stretch, and a generally dull appearance. When attempting to shape, it will feel resistant and may crack along the edges.
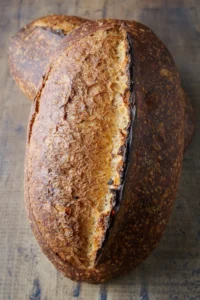
"Just Right" Dough (~68-75%):
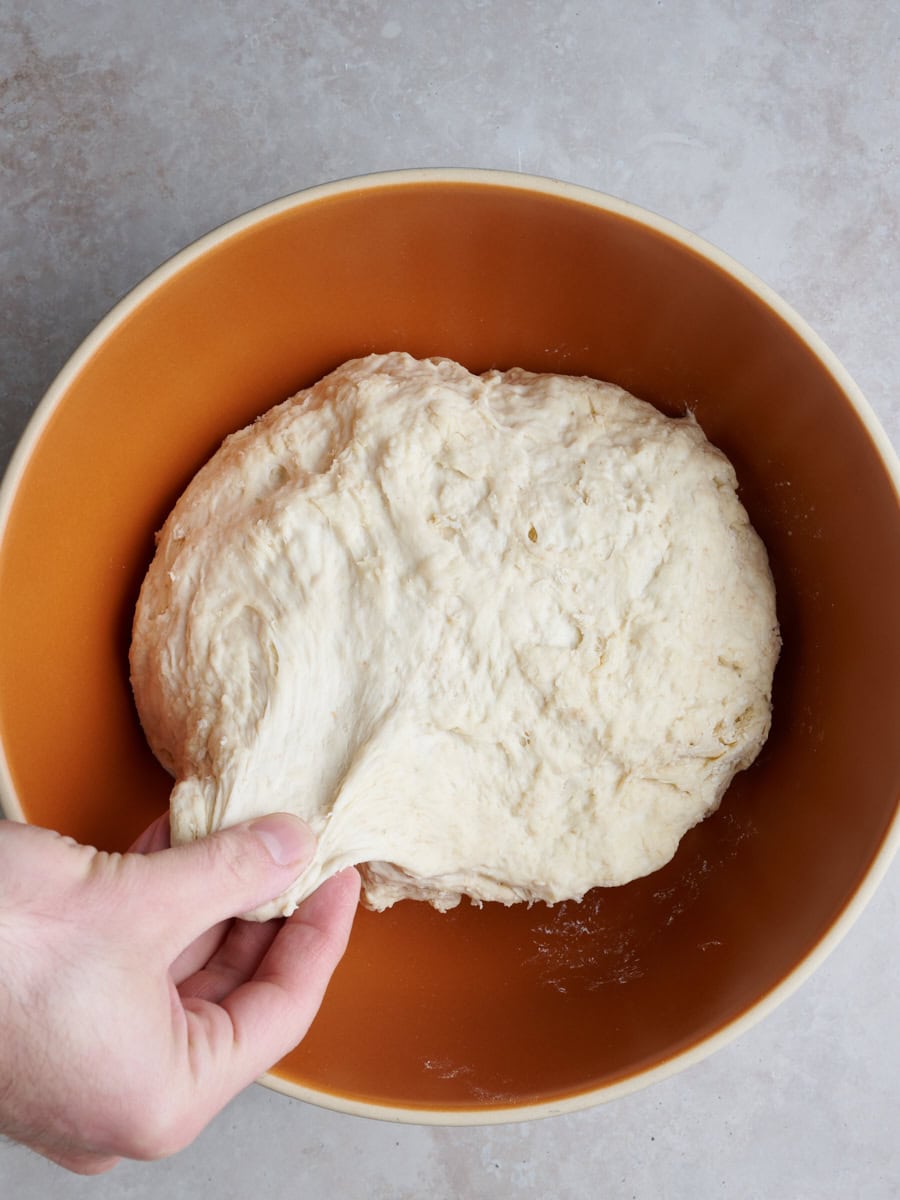
This is the sweet spot for many bakers, offering a balance of workability and potential for an open crumb. The dough will feel smooth, elastic, and slightly tacky, but not excessively sticky. It will stretch thinly without tearing, and when gently poked, it will spring back slowly. It should hold its shape reasonably well during bulk fermentation and be manageable for shaping. The surface will appear glossy and hydrated.
Over-Hydrated Dough (~75%+):
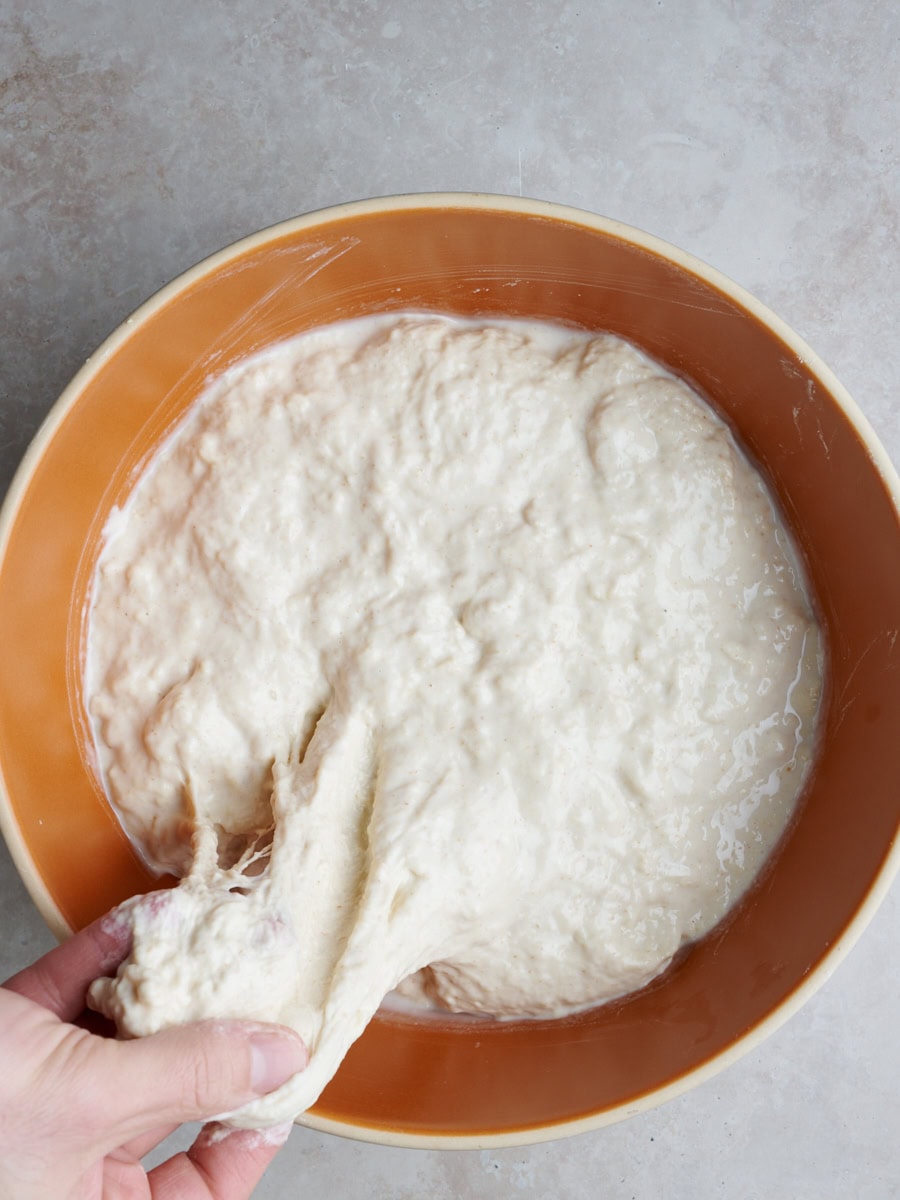
This dough will be noticeably slack and sticky, clinging tenaciously to hands and equipment. It will spread out in the bowl, lacking significant structure. While it can stretch, it will do so very thin and might be prone to tearing easily. Shaping this dough requires specialized techniques and often more flour on the work surface to prevent sticking. If fermentation proceeds too far, it can become a soupy mess.
The Technique of Bassinage: Enhancing Gluten Development
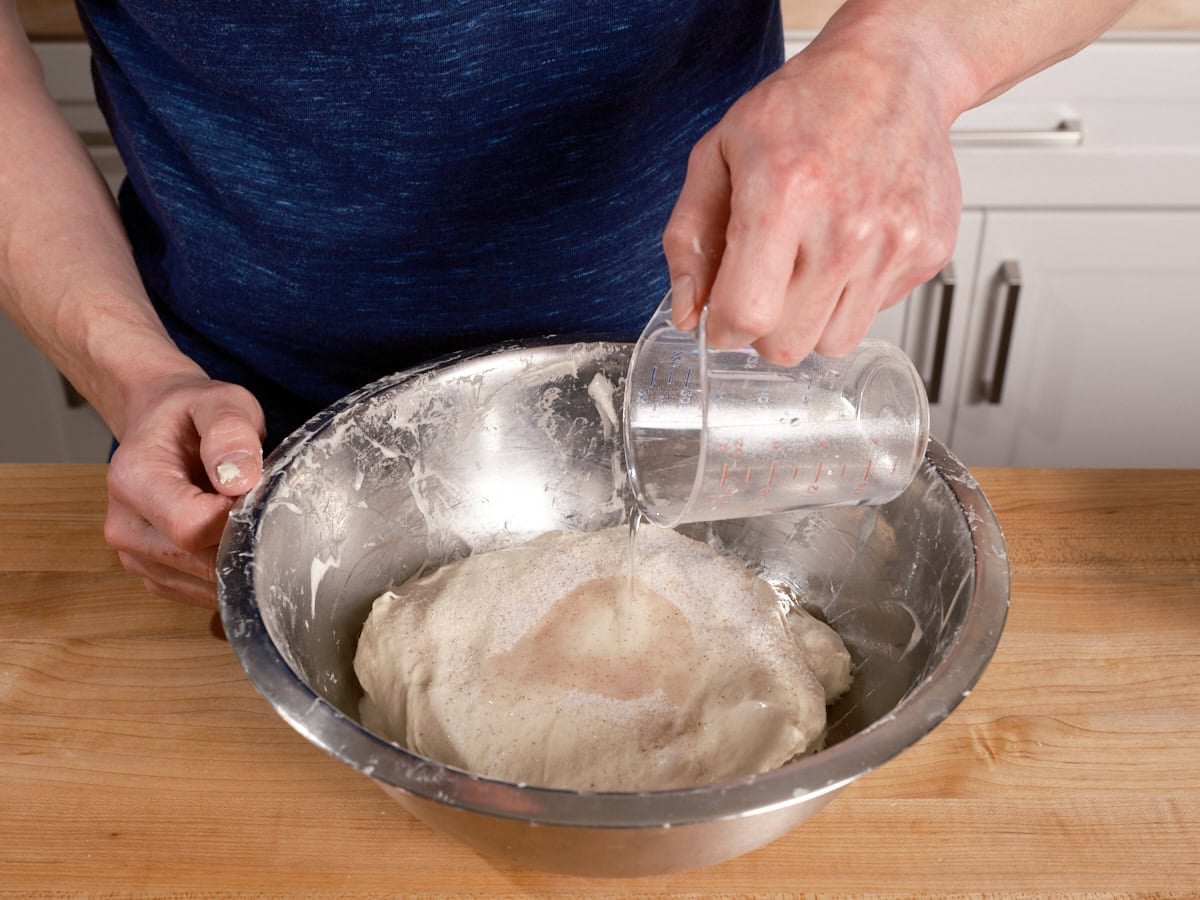
A technique that has significantly improved the handling and outcome of high-hydration doughs is bassinage, also known as "double hydration." This method involves holding back a portion of the total water and adding it gradually during the later stages of mixing, after the flour has begun to absorb water and the gluten network has started to form.
The benefits of bassinage are manifold. Firstly, it simplifies gluten development. Adding all the water at the outset, particularly in high-hydration recipes, can make it challenging to build a strong gluten structure. The excess water can hinder the friction needed for effective gluten formation. By incorporating most of the water initially, allowing some gluten development, and then gradually adding the remainder, bakers can achieve higher hydration levels without excessively long mixing times or compromising dough strength.
Secondly, bassinage provides a critical opportunity to assess dough strength. By reserving some water, bakers can gauge the dough’s consistency and determine if the additional liquid is necessary or beneficial. Many recipes incorporate this by specifying "Water 1" for initial mixing and "Water 2" as a reserve for later adjustment. If the dough feels overly slack and unmanageable after the initial mix, the reserved water can be omitted entirely. Conversely, if the dough feels robust and capable of incorporating more moisture, Water 2 can be added slowly while mixing.
Factors Influencing Dough Hydration Needs
Several key factors dictate the amount of water a dough requires:
- Flour Type and Protein Content: Flours with higher protein content (typically 12-14%, common in American bread flours) can absorb more water and generally require it to avoid a gummy texture. The protein forms gluten, a stronger network capable of holding more liquid. Conversely, lower-protein flours, prevalent in many international baking traditions, may necessitate reduced hydration to maintain dough manageability.
- Whole Grain Content: Whole wheat, rye, and other whole grain flours contain bran and germ, which are highly absorbent. Recipes with a significant proportion of these flours will require more water to achieve proper dough consistency. For example, a bread with 50% whole wheat might successfully incorporate 82% hydration, a level that would be challenging for a 100% white flour dough.
- Freshly Milled Flour: Flour that has been recently milled often absorbs more water than aged flour, even after sifting. This increased hydration is necessary to achieve the desired dough consistency.
- Climate and Environment: Altitude and humidity significantly impact flour’s moisture content and absorption. Bakers in arid, high-altitude regions like New Mexico may require higher hydration percentages than those in more humid, lower-altitude locations. Rainy days can increase the ambient moisture, potentially leading to flour absorbing more water from the air, thus requiring a slight reduction in added water.
Addressing Dough Stickiness
Sticky dough is a frequent concern for bakers, often stemming from issues with hydration, dough strength, or both. Common reasons for overly sticky dough include:

- Incorrect Hydration: The most direct cause is simply adding too much water for the type of flour being used.
- Insufficient Gluten Development: If the gluten network hasn’t been adequately developed, it won’t be able to effectively trap and hold the water, leading to a slack, sticky dough.
- Flour Characteristics: Some flours, particularly lower-protein or finely milled varieties, have a lower capacity to absorb water, making them more prone to sticking.
- Over-fermentation: If a dough ferments for too long, enzymes can break down the gluten structure, leading to a sticky and difficult-to-handle dough.
Navigating High-Hydration Doughs
As hydration levels increase, dough stability generally decreases. Pushing the water content essentially stretches the gluten matrix to its limits. Managing high-hydration doughs requires specific strategies:
- Gentle Handling: Avoid aggressive kneading or manipulation, which can tear the delicate gluten structure. Instead, focus on techniques like stretch-and-folds to build strength.
- Use of Water and Oil: Lightly wetting hands or using a small amount of oil can prevent excessive sticking during shaping without adding more flour, which would alter the hydration.
- Bench Scraper Proficiency: A good bench scraper is an indispensable tool for manipulating and shaping sticky doughs, allowing for clean lifts and transfers.
- Flour on the Surface: While the aim is to avoid adding too much flour, a light dusting on the work surface can be necessary for successful shaping.
- Patience and Practice: High-hydration baking is a skill that improves with experience. Understanding how the dough behaves at different stages is key.
Hydration Quick Reference Chart
| Hydration Level | Characteristics | Best For |
|---|---|---|
| 60-65% | Stiff, easy to handle, potentially thicker crust | Bagels, pretzels, pizza, some pan loaves |
| 65-70% | Balanced, manageable, good structure | Classic breads, beginner-friendly sourdough |
| 70-75% | Moderately open crumb, thin crust | Classic country loaves, baguettes |
| 75-80% | Requires longer mixing, tender crumb, requires skill | Ciabatta, focaccia, open-crumb loaves, sandwich loaves |
| 80%+ | Requires longer mixing, typically more open, custard-like, challenging to shape | High-hydration loaves |
Common Questions About Dough Hydration
Why can’t I just add more flour if my dough is too wet?
While it might seem like a simple solution, altering the flour quantity disrupts the foundational principle of baker’s percentages, where all ingredients are calculated in relation to the total flour weight. Adding flour changes this base, requiring recalculation of all other ingredients to maintain the intended ratios. Adjusting water, conversely, affects only the hydration level in isolation. However, in extreme cases where a dough is completely unmanageable, adding a small amount of flour and noting it for future reference can be a last resort.
Does higher hydration mean a more open crumb?
Not necessarily. Hydration is only one component influencing crumb structure. Fermentation, shaping technique, and baking methods all play critical roles. A well-executed lower-hydration dough can have a more open crumb than a poorly handled higher-hydration dough. Focusing on mastering all fundamental baking aspects is more beneficial than solely pursuing higher hydration.
What hydration should I start with as a beginner?
For novice bakers, a hydration level of 68-70% using a quality bread flour is highly recommended. This range offers a dough that is forgiving and manageable, yet capable of producing an excellent loaf. As bakers gain experience and develop an understanding of dough feel, they can gradually increase hydration.
What is the ideal hydration for bread dough?
There is no single "ideal" hydration. The optimal level is entirely dependent on the specific flour being used and the desired characteristics of the final bread. While most bread doughs fall within the 60%-80% hydration range, variations outside this spectrum are also common and achievable.
Cultivating Baker’s Intuition
Ultimately, mastering dough hydration is about cultivating sensitivity – what some refer to as "baker’s intuition." It involves learning to interpret the dough’s signals through touch and sight, rather than rigidly adhering to numerical values. Each bag of flour possesses unique properties, and daily environmental conditions vary. The most accomplished bakers treat recipes as starting points for a dynamic interaction with their ingredients.
A practical approach to developing this intuition is diligent note-taking. Recording the hydration percentage used, the dough’s feel during mixing and fermentation, prevailing weather conditions, and the characteristics of the final loaf provides invaluable data. Over time, this practice fosters an intuitive understanding of hydration that transcends any single guide.
The journey of sourdough baking is one of continuous learning and adaptation. By understanding the multifaceted nature of dough hydration, bakers can move beyond prescriptive recipes and engage in a more responsive, rewarding relationship with their craft, leading to consistently superior bread.